

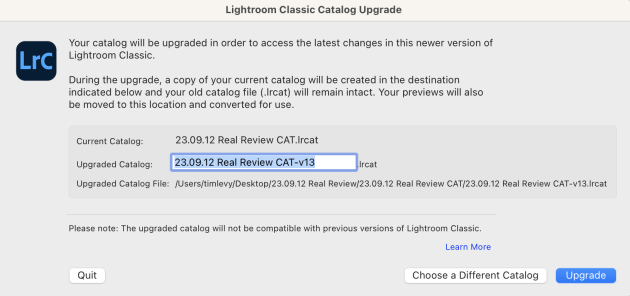
Lightroom has very recently updated to V13.0.1 and it is definitely a significant upgrade. In fact, when opening a legacy or older catalog, you will be prompted to upgrade to the current V13 version.
There is no cause for concern as your new and previous catalog version will now reside in the original parent folder.
Adobe’s Photography Subscription, which includes Photoshop, Lightroom and Bridge, is currently $171.50 per year, and it seems like good value as we have seen a fairly steady stream of regular, and very useful updates.
We’ll get into the latest V13 additions in a minute, but lets recap some of the recent changes from the past few months that we could honestly say are revolutionary in terms of both image quality and in decreasing time spent in post-production.
A Drumroll for Denoise
The Denoise function that utilises AI to tame unsightly speckled coloured noise is a complete game changer. Shooting at over ISO 6400 in the past resulted in images that were borderline 'unprofessional'.
Now we can shoot comfortably at ISO 6400 and even up to ISO 51,200. Just press denoise and problem solved.
Denoise is not only great for low light images shot for event photography, but it also works well with landscapes – especially where usually you’d need a graduated filter in an attempt to match the shadow detail of the ground and the highlights in the clouds and sky.
Denoise is also a saviour for photographers that need high shutter speeds in low light to capture fast moving animals, birds and athletes.
One tip - at the time of writing, we've discovered that it's better to denoise BEFORE developing the image instead of applying after developing the image. So select all the 'hero' images to denoise and go grab a coffee as it usually takes 15-20 seconds per image.
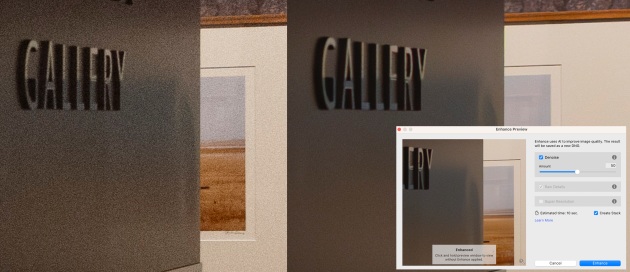
Another tip - combine Denoise with Photoshop Enlarge for even greater effect (the larger the image – the less you notice any artifacts or noise)
The Marvellous Masking System
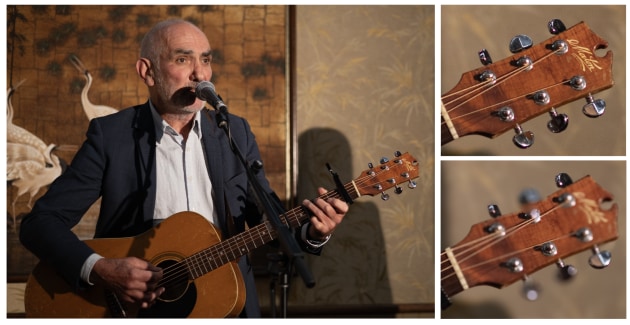
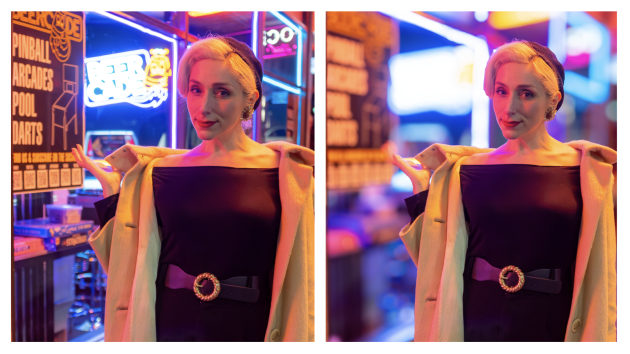
The AI improvements of the masking system have also been superb. If you are shooting a portrait and the background is too bright or too dark, or the white balance is different – it’s very easy to adjust instead of having to mess around selecting or dodging & burning in Photoshop. On top of this, we can now just select a human subject's skin or clothes whether it be arms, legs, face, teeth, whites of their eyes etc.
Recently this saved us at least 15 minutes in post for a portrait of someone who had warm toned foundation on their face, but their arms and legs skin were cold and blue. No problem – just auto-mask their appendages (leaving their face) and warm the skin by adjusting the white balance.
It's also great for flat-lay or portraits with a white background that is not a perfect white. Now it takes seconds to fix the background luminosity while leaving the subjects exposure untainted.
In fact, masking in post can save you time while shooting. Instead of having to add light with reflectors and strobes, you can often get away with just fixing it in post as long as you have a nice looking histogram.
The 13.0.1 Additions
Add Blur and Bokeh effects using Lens Blur
This is currently in ‘Beta Mode’ aka ‘Early Access’ in Lightroom parlance. While Photoshop rolls out and tests things in Beta versions, it also means you default to using the Beta version, thus having 2 versions of Photoshop running consecutively (using 5 gigs of HD space each).
So the implementation of just adding a new feature and calling it ‘Early Access’ in LR must be applauded.

We experimented with Lens Blur on multiple images and it is a bit of hit-and-miss but it’s easy to forgive when it’s in beta form.
Interestingly, you can not only select the amount of blur, but also choose five types of bokeh.
Circle: Modern circular lens
Bubble: Standard circular shape with over-correcter spherical aberration
5-blade: Penta effect, commonly seen in vintage lenses
Ring: Commonly seen in reflex or mirror lenses, also known as "Doughnut"
Cat Eye: Typically caused by optical vignetting in certain lenses
On top of this, you can also choose the 'depth of focus'. So if you have an image that is shot with a great depth of field (everything is sharp), you can select how much of the image will be in focus. For example, you can have the person in the foreground out of focus and have the background sharp.
Edit and Export in HDR
It's true that HDR is found on many new smart phones and some monitors – but it is still not a standard format. If you do consider getting an HDR monitor, you are also looking at paying a premium. Also editing in HDR on a SDR display is a non-starter. So being able to edit and export in HDR is a nice feature, but in a way, a bit premature for general use.

So Lightroom V13 does allow you to edit, display, and save images in High Dynamic Range (HDR) which will theoretically mean increased depth with brighter highlights, deeper shadows, and vivid colors. HDR displays offer greater brightness and contrast than Standard Dynamic Range (SDR) displays. Images optimized for HDR displays should result in greater impact and give a better sense of realism.
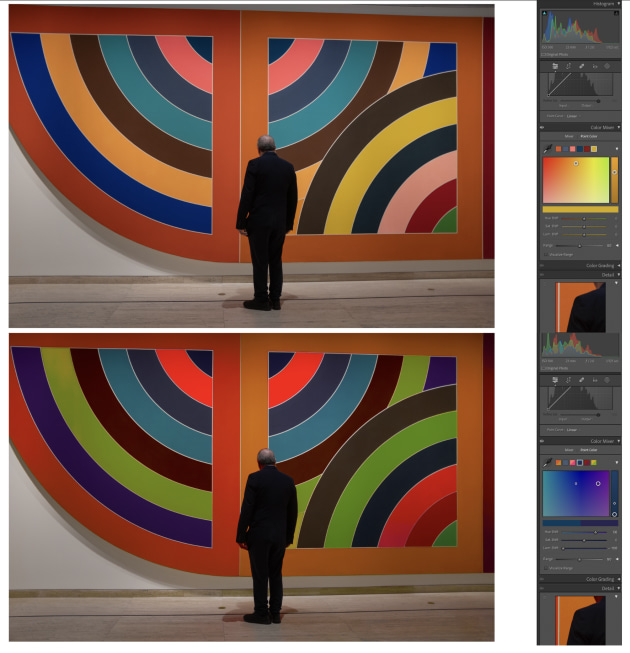
Colour Point
This allows you to use the eye-dropper to select a colour in the image, then add other colours so you can alter them individually in an attempt to create a more congruous colour palette.
Other performance improvements
• Faster image conversion to DNG.
• Improved performance of metadata operations like reading, writing, and metadata status.
• Faster response in XMP writing and reading.
• Improved stability and performance of folder move operations and folder delete operations.
• Faster image loading in the Develop loupe view during normal, fast, and turbo walk or random image selection.
• New Camera RAW support for recently released cameras – including: Panasonic G9M2, Sony A7CII & A7CR, Apple iPhone 15, Olympus TG-7 and Fuji GFX100II.
• New Lens Profiles.
So while the photography world is rightfully spooked by the idea of oncoming wave of AI images, we must remember that AI improvements used in software such as Lightroom also helps our own photography shot on 'normal' cameras.
Instead of spending many minutes per image, with all those minutes adding up per job, we can now perform the same tasks in seconds. AI really is our new best friend when it comes to enhancing and processing photos.
You can read more about the latest Lightroom updates on the Adobe website.