
Light your way to more creative wedding images
Recently, I released a book, LIT, which uncovers the lighting secrets of some of the world’s best wedding photographers.
I put LIT together to scratch my own itch of wanting to know how my favourite ‘artificially lit photos’ were created. I figured that if learning new wedding photography lighting techniques were useful to me, it would also be useful to other fellow wedding photographers wishing to progress in their art.
As for my own attempts at creatively lit wedding portraiture, I’m still very much in the experimentation stage. I find that toying around with a flash or LED light towards the end of my wedding day provides a release of creative freedom. Attempting to come up with ‘something from nothing’ is a welcome challenge, albeit at the end of an exhausting day, and I find it a refreshing way to break the monotony of repetitive dance-floor photography.
Far from being a master at off-camera lighting, I’d like to share my rudimentary method of attempting to squeeze something creative from the wedding venue lemons we’re so often dealt!
My method revolves around the basics of any kind of flash photography – subtracting and adding light. I ignore any technicalities, and hack my way into doing it as fast and efficiently as possible. Maybe you do the same thing?
Step 1 – Subtract the light
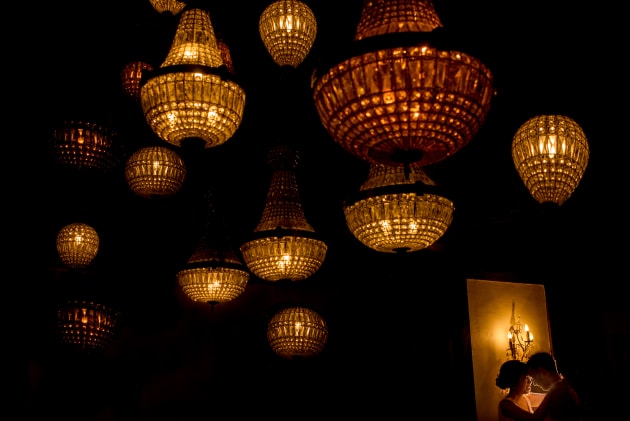
First, I like to underexpose the scene with my eyes. I do this by squinting my eyes until they’re almost closed, and seeing what objects in the scene are still emitting enough light to register in my vision.
You’ll see me walking around a wedding venue at some point near the end of the reception looking like I’m sleep-walking. People probably think I’m drunk…
In doing this, I’m quickly scanning the scene for (illuminated) objects I may like to include in the composition, or ones that I’d prefer to remove.
When I’ve found a scene that interests me, I’ll move on to the second part of the technique – using Live View to confirm the underexposure. If you’ve got a mirrorless camera, then you can use your EVF, but for the rest of us DSLR dinosaurs, we’ll be resorting to the Live View of our camera’s LCD.
Live View is a hugely underrated functionality in our cameras. We can take advantage of Live View to preview the exposure of a scene, before taking the photo. Live View effectively does away with “chimping”, getting us to our desired exposure much faster and more accurately than ever before.

With Live View (and exposure preview) turned on, I’ll switch the camera to Manual mode, and start underexposing the image by adjusting my camera settings. The key here is to use your shutter speed and aperture to decrease light in the exposure, while keeping the ISO as low as possible. Shooting at a lower ISO will give you more leeway in your post production, most notably in recovering lost shadow detail. Once you’ve underexposed your image sufficiently so that the illuminated areas are appearing as you wish, next you need to work on your composition.
Since any horizontal and vertical lines such as walls, floors or horizons will now be lost in the darkness, you’re free to twist and rotate your camera as you wish, using the illuminated objects to frame your subject, guide the viewer’s eye, or simply to be used as compositional elements.
Before you bring your subject into the frame, you have the option of attaching your camera to a tripod to ‘fix’ the composition, or you can just try and remember your composition to be used later. I prefer the second option since it gives me the flexibility to tweak my composition if I’ve got something slightly wrong.
If you plan to return to the shot later, another tip here is to utilise your camera’s Custom Settings. By saving the camera’s exact settings to one of the ‘custom memory banks’, you can switch back to whatever usual mode you shoot in, in order to re-join the wedding action, safe in the knowledge that you can return to your ‘LIT’ photo settings in an instant.
Step 2 – Add the Light
With your settings saved, or your camera in manual mode, you’ve just dealt with one big variable of the puzzle – the ambient exposure. If you’ve fixed your camera on a tripod, you’ve also partially dealt with another variable – the composition.
Now it’s time to deal with the next variable – the additional light. At this stage, it’s worth noting that the more experienced you are with using flashes or other lights, the quicker you’ll be able to estimate things like light distance and light output.

However, as this is a cheat’s guide to getting the photo, we’ll be resorting to a bit of light-chimping.
So, place your flash (or alternative light source) in whatever location you’ve chosen to light your subject:
– Perhaps you want a rim light, so position the flash to the rear of the subject.
– Maybe you want to rim light the couple, but include some of the background too, in which case you can point the flash towards a wall behind the couple, still keeping them close to the flash.
– Or perhaps you just want to light the subject properly, in which case you can point the flash at the subject from whatever frontal angle you choose.
At this stage, I’ll sometimes grab a member of the bridal party to use as my subject – they’re usually drunk enough to oblige!
Depending on your scene, you’ll need to adjust your flash output and the distance from your subject appropriately, but for most situations, you can start with flash output at around low-medium power and adjust from there.
I’d recommend placing your flash on a stand and leaving it in the same place (or instructing whoever’s holding it to remain still), and just adjust the flash output. Remember, you need to deal with all the variables one by one to un-complicate your shot. By keeping your light in one spot, you’ve just dealt with the distance/position variable.
Since you won’t be able to see your subject through your camera’s Live View with the ‘LIT’ photo settings, I’d recommend you use one of the auto settings on your camera (such as Program mode) which will force the camera to adjust its exposure to allow you to view the scene. Then it’s just a matter of directing your subject into your chosen position.
Finally, switch your camera back to your saved settings, tell your stand-in subject to get back to the dance floor, and go and find the newlyweds to take their place.

You can of course do all of the above while using the newlyweds as your actual subject, but I find it far smoother to set everything up in advance. Then it’s just a case of snap-snap… one creatively LIT photo complete.
Obviously the above wedding photography lighting technique is just a quick and dirty guide to getting something out of an uninspiring situation by using your lights.
This one lighting technique is just the tip of the iceberg, as you’ll see from the incredible work of the photographers in the LIT book. Nevertheless, I hope that you now feel motivated and inspired to get out there and try some creative lighting for yourself.
About the author
Mark Condon is a Sydney wedding photographer covering weddings all over the world. He runs the website Shotkit, and is the author of LIT, More Brides, Lightroom Power User and the Shotkit Books.

