
Innovative lighting techniques
Every photographer worth their salt knows the simplest of elements can be the difference between a great image and a stellar one. Engaging subject matter, composition, equipment, and photographer experience, are all fundamentals in capturing a memorable moment. However, it is the understanding of light that allows for infinite possibilities in creating precise mood, texture, and atmosphere. Sam Whiteley reports.
It’s one thing to know how to work with natural light, but those who have truly mastered the craft are also experts with flash – in studio and location. For this feature, we look at work by leading photographers to gain insights into how they go about lighting their images and what lighting solutions they rely on. We also explore how photographers’ experimentation with light not only separates them from the norm, but pushes boundaries through merging art and photography.
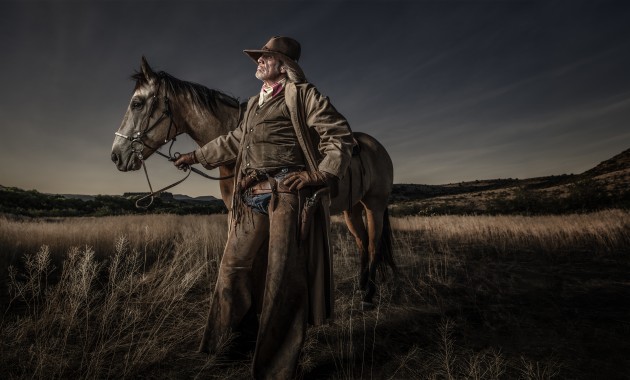
Gregory Heisler
With over 70 TIME covers under his belt, portrait specialist Gregory Heisler is no stranger to innovation and artistry. Renowned for his evocative images of politicians, actors, and sporting stars, the award-winning photographer and educator (he was recently appointed Distinguished Professor at the Newhouse School, Syracuse University, in New York) likens technique to a recipe – something that someone else can do with similar results. Style, however, he believes is within the photographer. “Style is your vision as expressed through your technique; it is where the technique becomes individualised,” says Heisler.

Sports Illustrated magazine.
Tools of the trade
Ten years ago, Heisler admits he wouldn’t have been caught dead with a speedlight. “They were little and plastic, but now they are very sophisticated,” says Heisler who is hesitant to advocate the tool, but acknowledges its merit. He believes that while the ETTL (evaluative through-the-lens metering) is not always accurate, it comes pretty close and can be tweaked, often saving photographers time, replacing the need to take multiple readings, images, and adjustments to get things right.
“Speedlights are small. You can put two of them in your bag with your camera and two zoom lenses and you can kind of do anything,” he says. “And you don’t need giant stands for them as they’re lightweight.” What Heisler particularly likes about them though is their capacity to zoom. “They go from 20mm to 200mm as you change the lenses, and if you actually manually set one of those to 200mm, it’s a grid spot right there; you don’t need an attachment.”
Tips and tricks
“When I think of pictures, I always think of the light first and foremost,” says Heisler, who laments that many photographers don’t consider light as much as they should. He doesn’t rely on any specific techniques for his images, preferring the brief to set the tone. “For me, all my lighting is driven by both the subject and the goal. I wouldn’t photograph Donald Trump the same way as a coal miner or the same way as a CEO or a fashion model. I would always let the subject dictate it,” says Heisler, who considers lighting as an element that should be nimble. “The way I see it, there’s available light, continuous light, LEDs, grid spots, HMIs, strobes, and speedlights, and all these different things, but to me, it’s just light, and the tools may vary for a number of reasons.”
Challenges overcome
Finding himself in an aircraft hangar (that once housed the infamous Hiroshima bomb, the Enola Gay) in the Utah desert, Heisler was faced with the dubious challenge of capturing ball lightening from a three-story, metal-framed lightening machine.
Using battery powered strobe lights and a radio transmitter, Heisler found the lightening played havoc with his equipment with flashes popping every time the machine was turned on. After several attempts, and hours later, Heisler resorted to manually hard wiring the strobe lights all together so that they would all fire simultaneously, eradicating the problem. It didn’t work. Heisler then decided to unplug everything, open his shutter and take multiple images using a range of f/2 all the way to f/22. “Only one came out!” Heisler exclaims, before hastening to add, “That might be the single worst time I ever had.”
Michael Grecco
Celebrated for his novel approach to lighting and dramatic portraits, Michael Grecco’s portraiture and urban landscape work is both brave and bold. Never one to rely on just one technique, Grecco approaches each situation individually, crafting the light on the computer screen as he preps the shot. “Early on I realised that well-lit images are not the same as evenly lit images. The image area can hold a range of exposures and by using that range, you naturally create drama. Because of that, my work, in part, became about the shadow and the dramatic aspect of lighting,” says Grecco, who shoots tethered to an X-Rite calibrated monitor, allowing for him to see the raw files in their full glory in Lightroom.
The ‘go to’ tools
Grecco always aims to use as little light as possible and uses strobes for all of his images to allow for control over the existing lighting with the f-stop controlling the strobe and the shutter speed controlling the existing light. This also freezes the subject. Utilising very tight grids on his strobes builds pools of light and accentuates the face, while the rest of the lighting is added as needed. “I also tend to wrap the light around the side of the subject, having it come in from the far side of the nose, across the face. Those are the basics I tend to use consistently,” says Grecco, whose favourite tools are extra small Chimera softboxes or small strips boxes with Lighttools egg crate fabric grids. “I get the best of both worlds this way – flattering soft light and tight dramatic pools. Also, my fill is always soft. It’s usually a Chimera 7-foot octabank, three to four stops below the face of the subject, directly behind me. I use a soft source because in my world, the fill should not be seen or detected, it is there just to fire pixels in the shadows.”

Handy hints
Grecco believes that having a variety of grids allows for more creative control in terms of the overall look and feel of the image. “Lighttools makes regular grids, but they also make grids that focus the light to the centre, so you can have a tight spot with a larger box. And their grey grids allow the light to hit the grid and scatter, so the surrounding area is not jet black. You can create varying degrees of darkness around the subject this way.”
Being resourceful
Grecco’s favourite portrait is of actor Will Ferrell, but the shoot didn’t start exactly the way he intended. “I saw the trailer to Blades of Glory and loved the polar bear rug used in the trailer,” he says. “It reminded me of the Jean Harlow portrait by [George] Hurrell, and the idea was to do a spoof of that image with a man, looking coy on the rug.”
The rug however, was a white rug, not a grizzly bear rug like the Hurrell image. The question then became, where do you go from there with a white rug? Grecco explains: “I decided to a do a whole white and white tableau, including white clothes, a white set, and the white polar bear rug. To fill this shot, I then decided to use a ring light to get that edgy, specular white feel. Also, the background light was gridded so that the corners got darker. The face light was also gridded to contain the light on the white clothes.” The image, by the way, landed on the cover of TIME.
Joel Grimes
Most people might consider colour-blindness a handicap for a professional photographer, but for Joel Grimes, it is not so much an affliction, but an ability that affords uniqueness and separates him from the masses. Grimes aims not to necessarily create light that duplicates the world around us, but to create illusions, whether they be flattering or dramatic, to make his subjects larger than life. “I want to create the wow factor!” he says. “I have received criticism for over-dramatising my subjects. To that I say, ‘Thank you’, and accept this as a compliment.” For Grimes, the most technical proficient photograph on the planet can be a complete bore, but it is the creator within that allows photographers to go that extra mile.
The gear
For his general go-to lights, Grimes uses Paul C. Buff Einstein flash gear, and recently he has been testing the Godox AD600 using the high-speed syncing. For modifiers, he uses all Westcott products. In fact, he played a part in helping to design their 24-inch travelling beauty dish, and uses that for many of his on-location portraits.
Advice
“Portraiture,” says Grimes, “… starts with a great subject and very controlled lighting.” A flattering light on the subject’s face, he says, creates drama or brings out the most character in his subjects. “I often use wide-angle lenses that place my subjects in expanded environmental backgrounds. In ways, it breaks the so-called rules of how to approach the traditional portrait. For my creative vision, I feel the most flattering lighting falls from the top down, placing the modifier right over the lens or cross light at 90 degrees from the angle of the camera. Master those two lighting approaches, and, if needed, add one or two edge lights, and you can just about duplicate any lighting technique out there.”
Grimes controls the softness or harshness of light striking the subject by controlling the size of the source or modifier with the distance to the subject. “Move any modifier closer to the subject and it will get softer, back it up it will get harsher. In addition, how much ambient or bounce light you have falling on your subject will soften the light. By controlling those two variables you can achieve any lighting look you want.”

subject as shot in Bethel, Kansas.
Solutions for trying times
For Grimes, the most challenging lighting scenario is matching one of his lighting techniques that he uses for a one-subject portrait. For example, using his three-light gritty look, but applying it to two, three, for even more subjects, and do it all in-camera. In a composite, this is fairly straight-forward, but in-camera, it’s a much bigger challenge. “One solution I have found is to get my largest modifiers and back them up around twenty feet so that the light is more equally distributed across my subjects. But this requires more room and lots of power sockets, and in some locations I just don’t have the distance. Another solution is to use smaller modifiers, but shoot each subject individually, but on multiple plates or exposures. Then in Photoshop, and working in layer masks, I can paint in each subject perfectly. It is kind of similar to a composite, but without having the painstaking task of cutting the subject out. I have been doing this technique a lot for my commercial ad campaigns.”
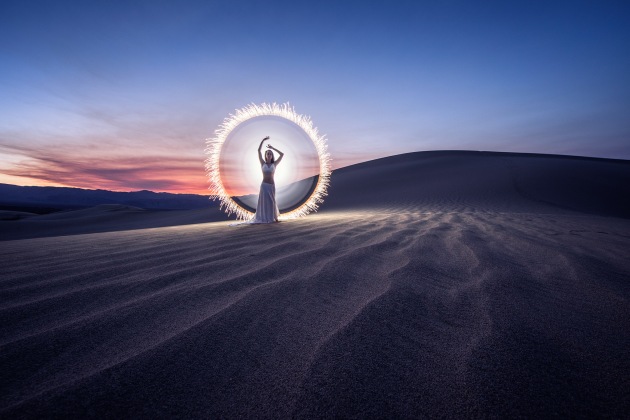
Patrick Rochon (the light painter)
Light painter extraordinaire and self-described fine artist, Montréal-based Patrick Rochon has been experimenting with light’s infinite possibilities since 1992. His work has evolved over time through his continued experimentation with the Liteblade, his own creation, and a tool that is “meant to be painted, sanded, broken, re-built, taped etc. The philosophy is not that you pull it out of the box and start light painting. The idea is for you to get into your own creative processes and discoveries that gives you so many possibilities.”
Rochon’s images are of an ethereal and almost spiritual quality. A style of long exposure photography that uses light to ‘paint’ his subjects, Rochon ‘paints’ with beams and twisted swirls and arcs of light, where bright neons merge with deep shadows to create unique visuals that push boundaries of light manipulation.

The Liteblade
You could be forgiven for thinking you’d just stepped onto a Star Wars film set when Rochon wields his masterly blade of light. Resembling Luke Skywalker’s lightsaber, the once-rudimentary Liteblade (first developed in 2011) underwent numerous transformations. After years of crafting and honing the Liteblade, it has become a necessity for light painters, is easy to use, and offers infinite possibilities. “If you use all these gels around it, it creates these effects. If you start sanding your tools with sandpaper, it can produce a milky effect, and if you want to put a re-varnish on top of it, you can get something different again. It is a tool that is meant to be used to sculpt, and transform your work.”
How’s it done?
Rochon recommends using a basic camera, tripod, manual settings on camera (as you are in the dark), and to set the camera to ISO 100. Use a bulb setting, or if not, adjust the shutter to 15 or 30 seconds exposure so you have a long exposure. Remember, you are working in complete darkness. Move in front of the camera, using any kind of flashlight, and start moving in circles or motions.
“It’s pretty simple. A lot of people want a quick result and with light painting you can get that. It’s fun and if you understand the basics, you can get some fast and interesting results,” says Rochon. “Right now, all I use is my Liteblade because it keeps evolving, and I use the Klarus lights because I think they have great interfacing. You can create amazing photos really fast with it.”
For studio set ups, Rochon is a fan of a black background for maximum richness of detail in the light. “For the model, the idea is to start lighting where the most important parts are and then go outwards from there. Don’t come back with another layer over time otherwise you get double faces, triple eyes, etc. You fix the eyes first, and then face, and then the body.”
Working in darkness
“The hardest thing is to light paint a model in 360 degrees,” says Rochon whose ninja-like deftness and coordination are put to the test for a shoot of this kind. With multiple cameras in a circle pointing in every direction and working in complete darkness, Rochon has learnt to work in such a way that allows him to be ‘outside’ the light, and avoid blocking a camera or revealing a shadow by ‘painting’ from above.
“You can’t actually see what you are doing, and your tools are all lined up on the floor. You have to find all your tools and the model in the dark. You work in the darkness, but you see the results straight away and there are always surprises. You can see the magic, the highlights, and combinations of colours and textures. It’s really special.”
Eric Paré
Another force in the arena of light painting, Eric Paré sees his technique and craft as “a lifestyle; no more, no less.” For him it’s all about the fact that he’s not behind the camera. Paré much prefers to craft the light by hand, by being with the model which also allows him to be part of the final image. “I feel like light-painting is a little bit like your voice,” he says. “Each one is unique. You can try to mimic another person’s voice, but if you stay true to yourself, you’ve always come up with some unique visuals.”

The gear
For Paré, his primary tool is his flashlight. Using the LEDs manufactured by Eagletac, Klarus, and Nitecore, he creates optimum light conditions for his otherworldly images. “It’s from this flashlight that the magic starts to happen: I put so many different things on top of it to give me colours, textures, and pattern,” says Paré whose initial solution to perform light painting was by using four feet plastic tube.
How he does it
For projects such as LightSpin or One Step Ahead, Paré used 24, then 32, cameras on a circular structure with a light in his right hand and a remote control in his left hand. Practising the movement with the dancer to make sure they’re following the same path, Paré and model are immersed in darkness. “Basically, he or she is going to move by a few centimetres for each picture – the stop-motion part. And for each pose, I do one circle with my light around the dancer in about one second – the light-painting part. All of the cameras are triggered in perfect sync for every shot –the bullet-time part. In the end, one sequence can take a few minutes to create, but the playback is only a few seconds. It’s very tricky, but that’s the kind of challenge I like: the experience is incredible, and the end result is unique and elegant.”
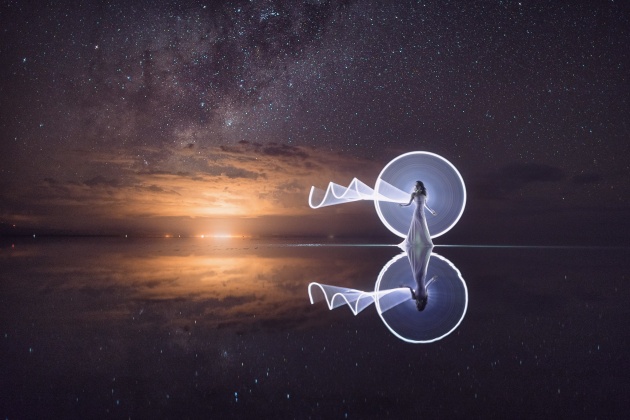
Created in Uyuni, Bolivia, with Kim Henry.
Finding the balance
Combining the milky-way and tube light-painting is something that took Paré a long time to perfect in-camera (as opposed to doing multiple exposures). “I managed to do it by drastically lowering the power of my flashlight from 1200 to 30 lumens, and by using a very large aperture. It’s always a question of balance, but this was something I didn’t know was possible until just a few months ago,” says Paré.
Other interesting experiments include ‘long exposure flowing sand,’ to capture sand in a fluid motion without Paré visible to the camera. This entails model and photographer moving in sync. “This requires so much precision,” says Paré. “She has to let go of the sand one hand at a time following my movement. But that also means she has to grab the sand super quickly before the exposure and then stay perfectly still.”
Final thoughts
From speedlights, strobes, grids, soft boxes, LEDs, octabanks to Liteblades and plexiglass and torches, learning how to light and create amazing images according to Joel Grimes, “…is no different to learning how to play a musical instrument. The more you practise, the better you get. How many hours you put into your craft is the secret. So out-practise your competition!”
With so many creative tools and inspirations, it’s easy to feel lost amidst the sea of choice. Limited only by imagination, (and maybe budget too,) these tools make for fun times exploring, innovating, and providing photographers with an opportunity to find their own unique, artistic style. In the words of photographic pioneer, George Eastman: “Light makes photography. Embrace light. Admire it. Love it. But above all, know light. Know it for all you are worth, and you will know the key to photography.”
Contacts
Michael Grecco
Joel Grimes
Gregory Heisler
Eric Paré
Patrick Rochon

Get more stories like this delivered
free to your inbox. Sign up here.